전 게시글은 아래를 참고 해주세요.


Spring Boot JPA 게시판 - CRUD (with MySQL)

Spring Boot 게시판 프로젝트를 시작하기 위해 Database 생성하고 끝냈었다. MySQL 접속 및 database 생성 MySQL을 Docker 에 설치하였고, Spring boot 와 연동하기 전 database 를 생성해보자. Docker에 MySQL을..

mkdevlab.tistory.com


게시글을 등록/수정 할 수 있는 기능을 추가해보자.

신규 생성한 소스

  • BoardRestController
  • BoardService
  • BoardRequestDto
  • BoardResponseDto

수정한 소스

  • Board (Entity)


1. Request(요청) Dto 생성

API로 요청할 때 데이터를 객체화 할 Request Dto 를 생성한다.

package com.mkdevlab.springbootboard.dto;

import com.mkdevlab.springbootboard.domain.Board;

import lombok.AccessLevel;
import lombok.Getter;
import lombok.NoArgsConstructor;

@Getter
@NoArgsConstructor(access = AccessLevel.PROTECTED)
public class BoardRequestDto {
	
	private String title;
	private String content;
	private String writer;
	private char deleteYn;
	
	public Board toEntity() {
		
		return Board.builder()
				.title(title)
				.content(content)
				.writer(writer)
				.deleteYn(deleteYn)
				.build();
	}

}

toEntity()

Entity, 즉 테이블에 해당 값을 넣기 위해 Entity 화를 해준다고 보면 된다.


2. 응답(Response) Dto 생성

요청이 오면 DB 에서 값을 조회하고 객체에 담아주기 위해 생성한다.

package com.mkdevlab.springbootboard.dto;

import java.time.LocalDateTime;

import com.mkdevlab.springbootboard.domain.Board;

import lombok.Getter;

@Getter
public class BoardResponseDto {

	private Long id;
	private String title;
	private String writer;
	private String content;
	private char deleteYn;
	private int hits;
	private LocalDateTime createdDate;
	private LocalDateTime modifiedDate;
	
	public BoardResponseDto(Board entity) {
		this.id = entity.getId();
		this.title = entity.getTitle();
		this.writer = entity.getWriter();
		this.content = entity.getContent();
		this.deleteYn = entity.getDeleteYn();
		this.hits = entity.getHits();
		this.createdDate = entity.getCreatedDate();
		this.modifiedDate = entity.getModifiedDate();
	}
}


3. Entity 수정 기능 추가

package com.mkdevlab.springbootboard.domain;

import java.time.LocalDateTime;

import javax.persistence.Entity;
import javax.persistence.GeneratedValue;
import javax.persistence.GenerationType;
import javax.persistence.Id;

import lombok.AccessLevel;
import lombok.Builder;
import lombok.Getter;
import lombok.NoArgsConstructor;

@Getter
@NoArgsConstructor(access = AccessLevel.PROTECTED)
@Entity
public class Board {
	
	@Id
	@GeneratedValue(strategy = GenerationType.IDENTITY)
	private Long id; // PK
	
	private String title;
	
	private String content;
	
	private String writer;
	
	private int hits;
	
	private char deleteYn;
	
	private LocalDateTime createdDate = LocalDateTime.now();
	
	private LocalDateTime modifiedDate;

	@Builder
	public Board(String title, String content, String writer, int hits, char deleteYn) {
		this.title = title;
		this.content = content;
		this.writer = writer;
		this.hits = hits;
		this.deleteYn = deleteYn;
	}
	
	public void update(String title, String content, String writer) {
		this.title = title;
		this.content = content;
		this.writer = writer;
		this.modifiedDate = LocalDateTime.now();
	}
}

update() 메소드를 추가한다.

잉..? 근데 이건 그냥 Board의 값을 update 해주는 거지, 서버로 SQL 을 날리는 작업을 하는 건 보이지 않는다... WoW


4. Service 생성

package com.mkdevlab.springbootboard.service;

import java.util.ArrayList;
import java.util.List;
import java.util.stream.Collectors;

import org.springframework.data.domain.Sort;
import org.springframework.data.domain.Sort.Direction;
import org.springframework.stereotype.Service;
import org.springframework.transaction.annotation.Transactional;

import com.mkdevlab.springbootboard.domain.Board;
import com.mkdevlab.springbootboard.dto.BoardRequestDto;
import com.mkdevlab.springbootboard.dto.BoardResponseDto;
import com.mkdevlab.springbootboard.repository.BoardRepository;


import lombok.RequiredArgsConstructor;

@RequiredArgsConstructor
@Service
public class BoardService {
	
	private final BoardRepository boardRepository;
	
	/*
	 * 게시글 생성 
	 */
	@Transactional
	public Long save(final BoardRequestDto param) {
		
		Board entity = boardRepository.save(param.toEntity());
		return entity.getId();
	}
	
	/*
	 * 게시글 리스트 조회
	 */
	public List<BoardResponseDto> findAll() {
		Sort sort = Sort.by(Direction.DESC, "id", "createdDate");
		List<Board> list = boardRepository.findAll(sort);
		
		// Stream API 를 사용하지 않는 경우		
	    List<BoardResponseDto> boardList = new ArrayList<>();
	    
	    for (Board entity : list) {
	        boardList.add(new BoardResponseDto(entity));
	    }
	    
	    return boardList;
		
		
		//return list.stream().map(BoardResponseDto::new).collect(Collectors.toList());
	}
	
	/*
	 * 게시글 수정
	 */
	@Transactional
	public Long update(final Long id, BoardRequestDto param) {
		
		//Board entity = boardRepository.findById(id).orElseThrow(() -> new NullPointerException());
				
		Board entity = boardRepository.findById(id).orElse(null);

	    if (entity == null) {
	        throw new NullPointerException();
	    }	   
	    
		entity.update(param.getTitle(), param.getContent(), param.getWriter());
		return id;
	}
}

save()

이 기능은 이 전 게시글에서 봤듯이 repository 의 save() 기능을 사용하고 있다.


findAll()

이것도 전 게시글에서 테스트 할 때 봣듯이 repository 의 findAll() 기능을 사용하고 있다.


update()

repository 의 update 기능이 없는건가? 라고 생각할 수 있는 부분인데, JPA 의 영속성 컨텍스트라는 개념이 등장한다.

가볍게 말하면 Spring 과 Database 사이에 Entity를 관리하는 영역이 있고, 그 영역에서 entity의 값이 바뀌면 물고 있다가 commit 이 일어나면 Database 로 변경된 값으로 저장하는 것이다.


@Transactional

service 클래스에서는 필수적으로 사용되고, 메소드 단위로 사용된다.

가볍게 말하면 이 녀석의 역할은 Transaction 을 시작(begin), 종료(commit), 예외(rollback) 처리해준다.

위에 update() 와 같이 Transaction 이 오류 없이 완료되면 commit 이 되기 때문에 Database 의 값이 변경된다고 생각하면 될 것 같다.


5. Controller 생성

package com.mkdevlab.springbootboard.controller;

import java.util.List;

import org.springframework.web.bind.annotation.GetMapping;
import org.springframework.web.bind.annotation.PatchMapping;
import org.springframework.web.bind.annotation.PathVariable;
import org.springframework.web.bind.annotation.PostMapping;
import org.springframework.web.bind.annotation.RequestBody;
import org.springframework.web.bind.annotation.RequestMapping;
import org.springframework.web.bind.annotation.RestController;

import com.mkdevlab.springbootboard.dto.BoardRequestDto;
import com.mkdevlab.springbootboard.dto.BoardResponseDto;
import com.mkdevlab.springbootboard.service.BoardService;

import lombok.RequiredArgsConstructor;

@RestController
@RequiredArgsConstructor
@RequestMapping("/api")
public class BoardRestController {
	
	private final BoardService service;
	
	@PostMapping("/boards")
	public Long save(@RequestBody BoardRequestDto param) {
		
		return service.save(param);
	}
	
	@GetMapping("/boards")
	public List<BoardResponseDto> findAll(){
		return service.findAll();
	}
	
	@PatchMapping("/boards/{id}")
	public Long save(@PathVariable Long id, @RequestBody BoardRequestDto param) throws Exception {
		return service.update(id, param);
	}

}


Advanced Rest client 를 사용해서 잘 작동하는 지 확인해보자.


1. 게시글 등록

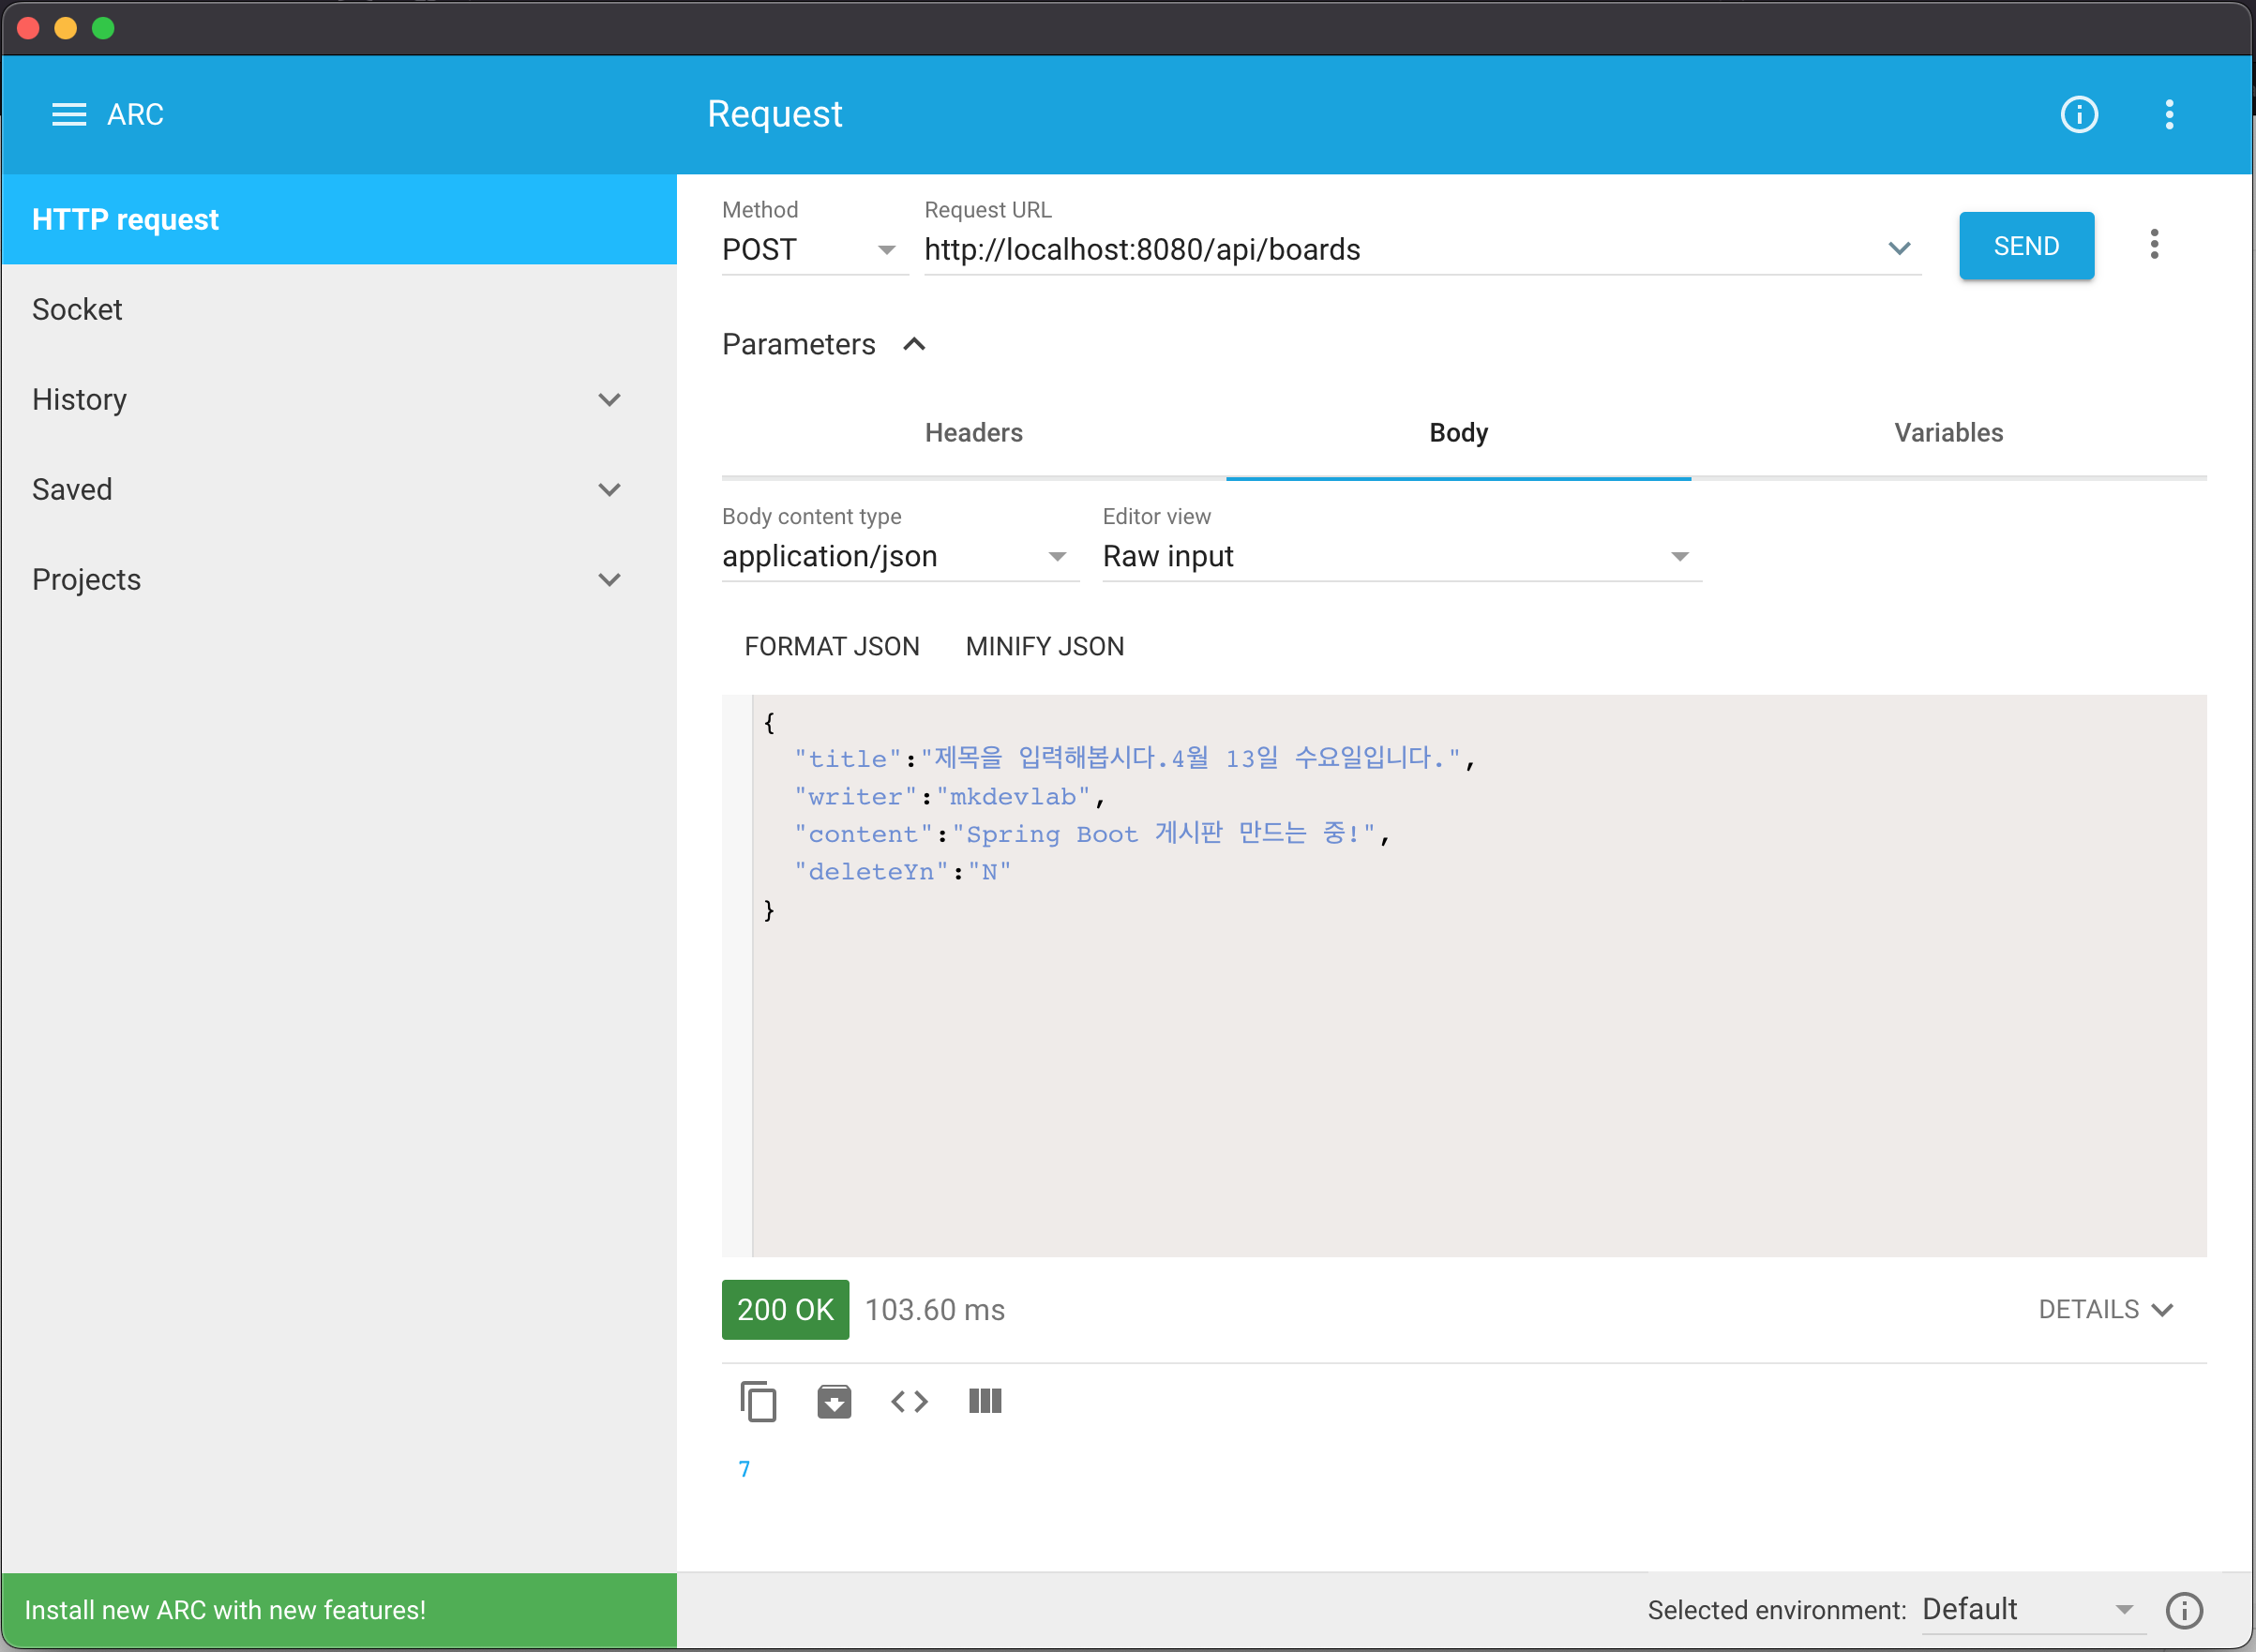
7 이라는 숫자가 찍힌 걸 볼 수 있다. PK 로 지정했던 id 의 값이다. 이제 DB 에 저장되었는 지 확인해보자.


잘 저장 되었다!


2. 게시글 조회 (findAll())
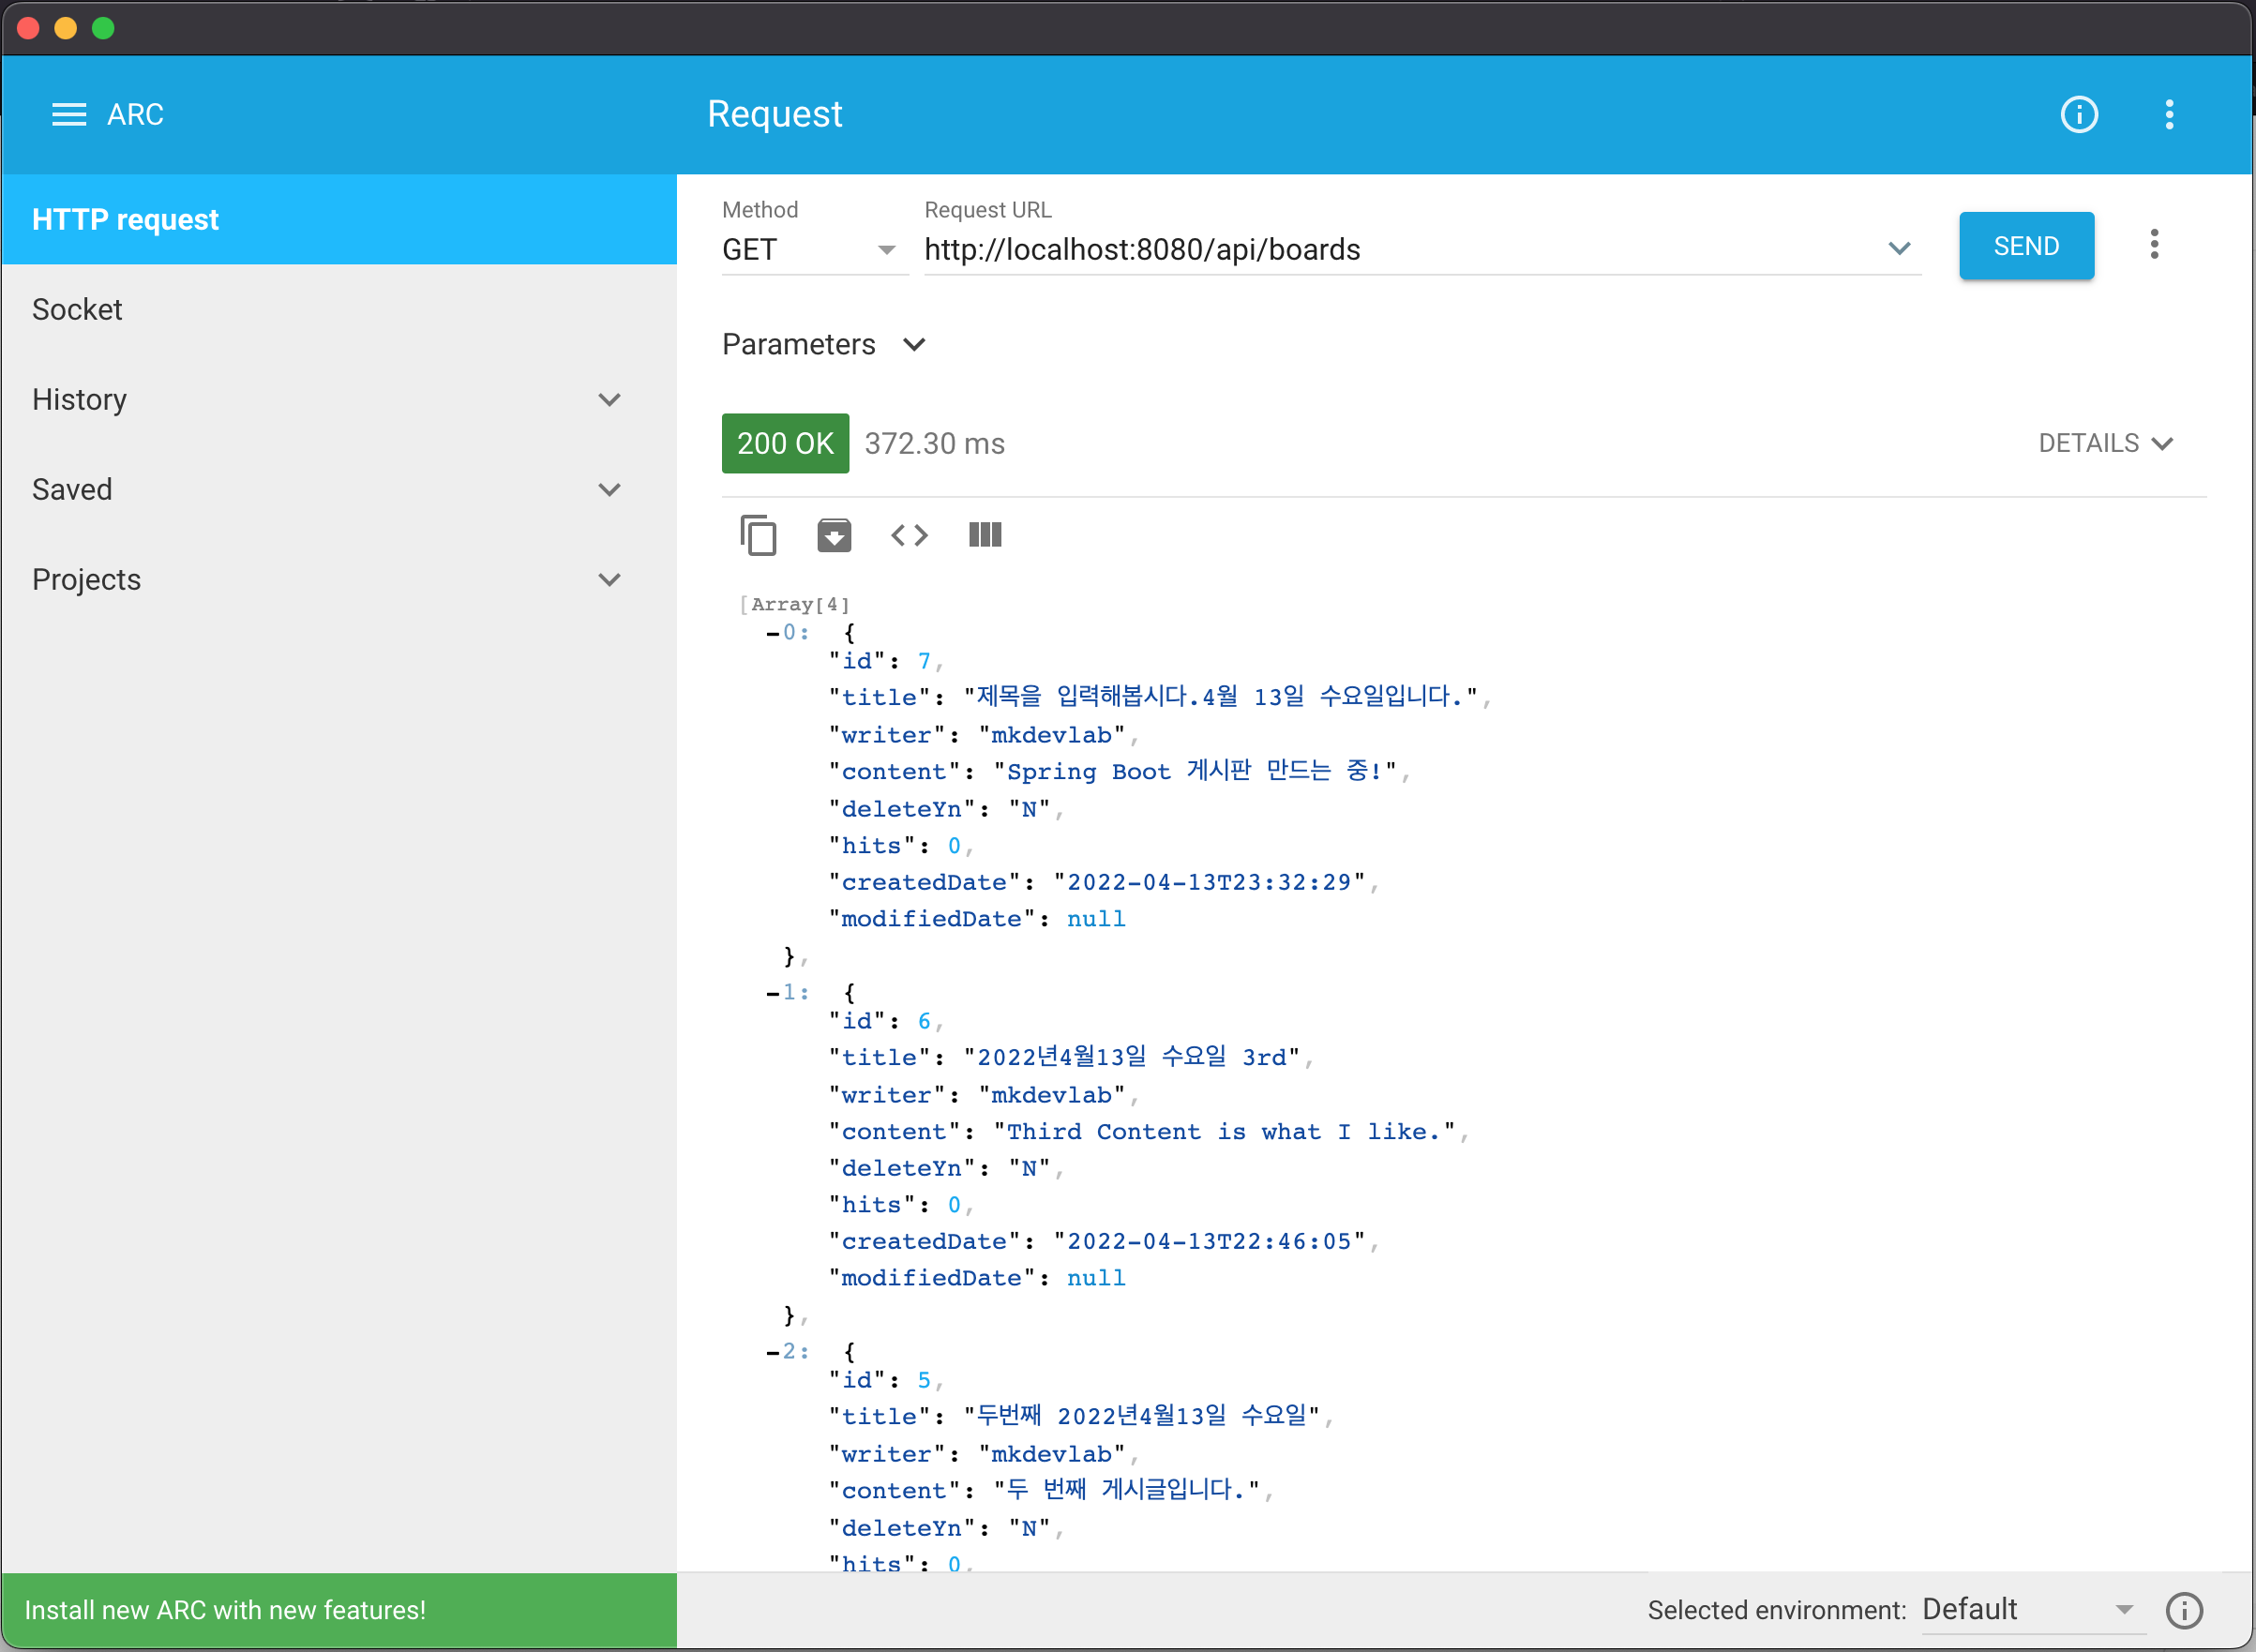
리스트로 잘 나온다!


3. 게시글 수정

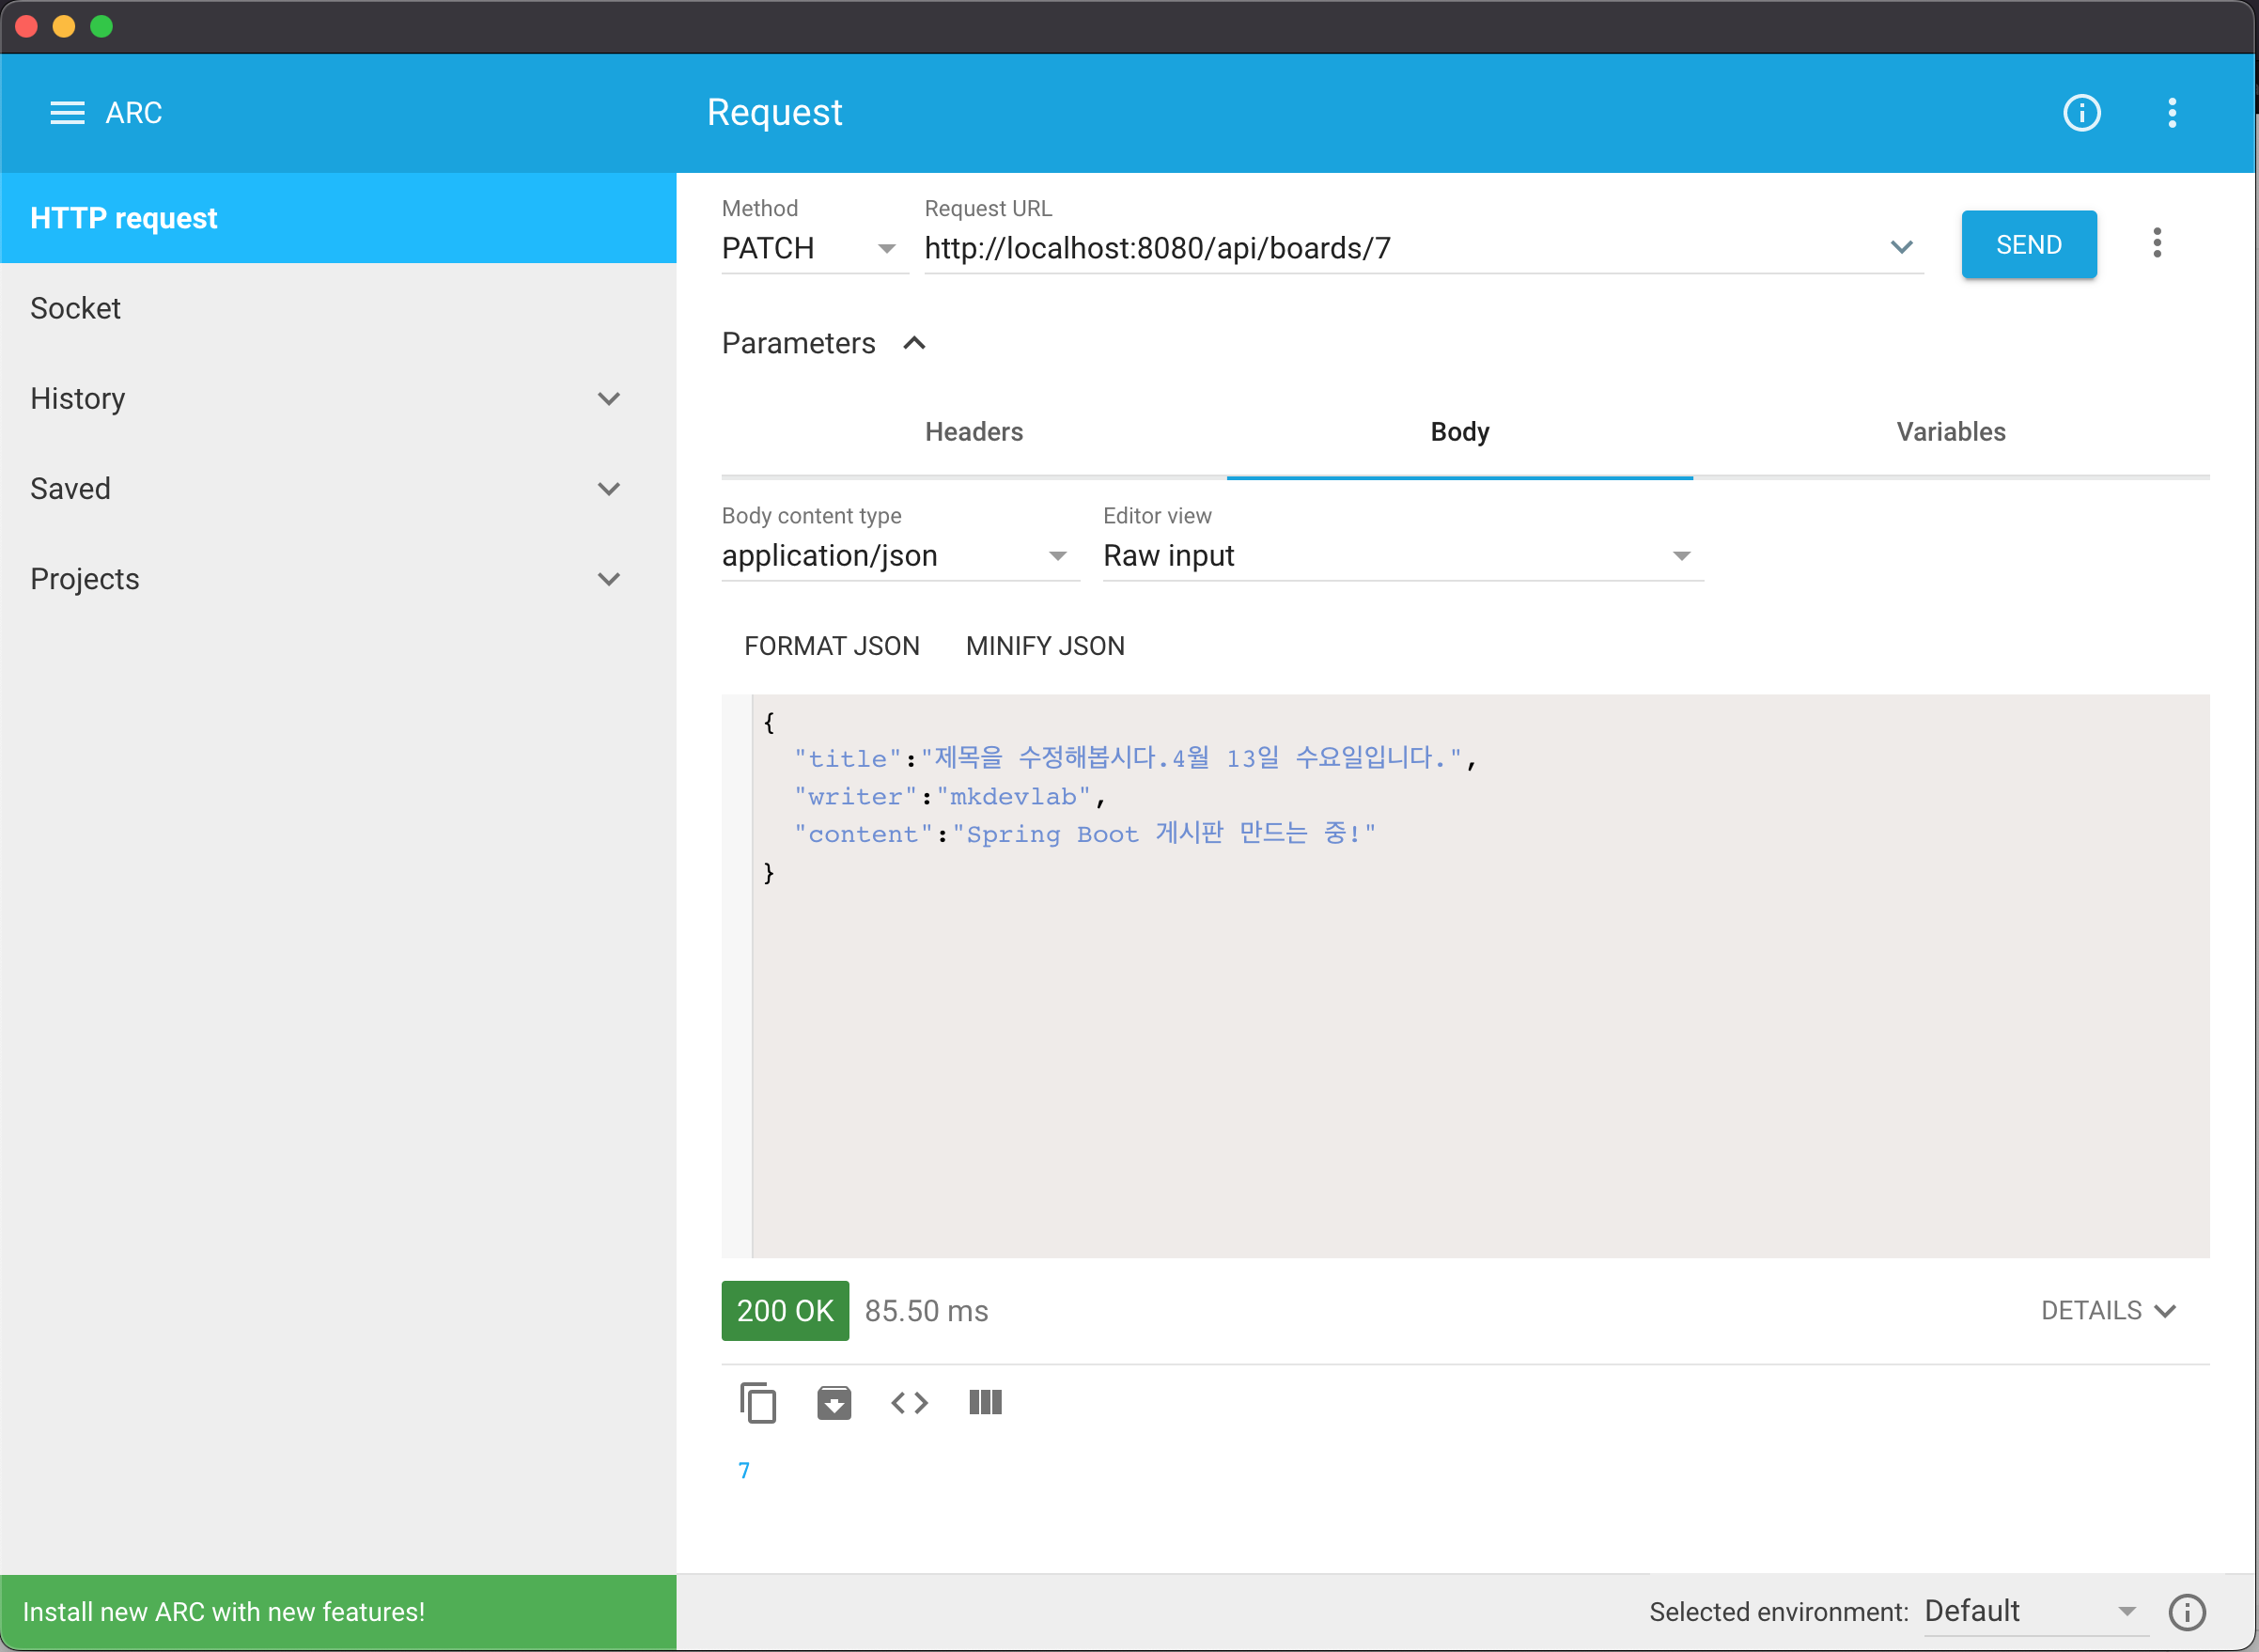
제목을 수정하고 SEND를 누르자 7 이라는 숫자로 Return 온 것을 확인하였다. 실제 DB를 조회해보자.


title 이 바뀐걸 볼 수 있고, modified_date 가 update 된 걸 볼 수 있다.


이것으로 게시글 CRUD 를 모두 살펴보았다.


이렇게 아주 간단하게 backend 영역을 살펴보았다.


다음에는 frontend 영역으로 이동해서 게시판 화면을 만들어보도록 하자!


끝.


Reference

https://congsong.tistory.com/55?category=749196 


'개발이야기 > Spring Boot' 카테고리의 다른 글

Spring Boot JPA 게시판 - CRUD (with MySQL)  (0) 2022.04.11
Spring Security  (0) 2022.04.10
ORM  (0) 2022.04.03

Spring Boot 게시판 프로젝트를 시작하기 위해 Database 생성하고 끝냈었다.


MySQL 접속 및 database 생성

MySQL을 Docker 에 설치하였고, Spring boot 와 연동하기 전 database 를 생성해보자. Docker에 MySQL을 설치하는 방법은 아래 글을 참고! (Mac) Docker 에 MySql 설치하기 1. Docker 공식 홈페이지의 가이드를 확..

mkdevlab.tistory.com


게시판에 사용 할 Table 을 만들고, Spring Data JPA 를 이용해서 Create, Read, Delete 를 구현해보자.


오늘은 JUnit 을 이용해서 Table 에 잘 들어가고, 삭제가 되는 지 Test 만 진행해보고자 한다.


그럼 시작 !


0. application.properties 수정

# datasource
spring.datasource.driver-class-name=com.mysql.cj.jdbc.Driver
spring.datasource.url=jdbc:mysql://localhost:3306/mkdevlab?serverTimezone=Asia/Seoul&useUnicode=true&characterEncoding=utf8&useSSL=false&allowPublicKeyRetrieval=true
spring.datasource.username=root
spring.datasource.password=password

# Resource and Thymeleaf Refresh
spring.devtools.livereload.enabled=true
spring.thymeleaf.cache=false

# JPA Properties
spring.jpa.database=mysql
spring.jpa.database-platform=org.hibernate.dialect.MySQL5InnoDBDialect
spring.jpa.generate-ddl=false
spring.jpa.hibernate.ddl-auto=none
spring.jpa.open-in-view=false
spring.jpa.show-sql=true
spring.jpa.properties.hibernate.format_sql=true
spring.jpa.properties.hibernate.use_sql_comments=true


1. Spring Boot 프로젝트 생성

Type : Gradle

Java : 8

Packaging : Jar


Dependency 

  • Lombok
  • Thymeleaf
  • MySQL Driver
  • Spring Data JPA
  • Web
  • Spring Security (로그인도 같이 구현할 것이다)


2. 기초 Package 생성

  • config
  • controller
  • domain
  • dto
  • repository
  • service


3. domain - Board Entity 생성


package com.mkdevlab.springbootboard.domain;

import java.time.LocalDateTime;

import javax.persistence.Entity;
import javax.persistence.GeneratedValue;
import javax.persistence.GenerationType;
import javax.persistence.Id;

import lombok.AccessLevel;
import lombok.Builder;
import lombok.Getter;
import lombok.NoArgsConstructor;

@Getter
@NoArgsConstructor(access = AccessLevel.PROTECTED)
@Entity
public class Board {
	
	@Id
	@GeneratedValue(strategy = GenerationType.IDENTITY)
	private Long id; // PK
	
	private String title;
	
	private String content;
	
	private String writer;
	
	private int hits;
	
	private char deleteYn;
	
	private LocalDateTime createdDate = LocalDateTime.now();
	
	private LocalDateTime modifiedDate;

	@Builder
	public Board(String title, String content, String writer, int hits, char deleteYn) {
		this.title = title;
		this.content = content;
		this.writer = writer;
		this.hits = hits;
		this.deleteYn = deleteYn;
	}
}

@Getter

getter 메소드를 생성해주는 lombok 의 기능입니다.


@NoArgsConstructor(access = AccessLevel.PROTECTED)

기본 생성자를 생성해주는 어노테이션으로, access 옵션을 추가하여 접근 범위를 설정할 수 있다.

동일 패키지 내에서만 해당 클래스를 접근 할 수 있도록 PROTECTED 로 설정.


@Entity

해당 클래스가 Table의 역할을 한다는 것을 명시하는 어노테이션이다.

별도로 테이블명을 옵션으로 지정할 수 있지만, board 라는 테이블을 생성할 것으로 패스.


@Id

PK 역할을 하는 컬럼을 지정 한다고 생각하면 된다.


@GeneratedValue(strategy = GenerationType.IDENTITY)

PK 생성 전략을 설정하는 어노테이션이라고 합니다.

IDENTITY 는 MySQL의 auto increment 기능을 구현해준다.


@Setter

setter 를 추가하지 않는 것은 Entity 객체는 Table 과 같으므로, 각 변수 = 컬럼의 정보에 대해 무작정 setter 가 된다고 하면 해당 컬럼의 데이터가 언제 어떻게 들어갔는 지 알 수 없다. Entity에서는 사용하지 않거나, 특정 컬럼 정보에 한해서 어노테이션을 적용해주면 되는 것 같다.


4. repository - BoardRepository 생성

package com.mkdevlab.springbootboard.repository;

import org.springframework.data.jpa.repository.JpaRepository;

import com.mkdevlab.springbootboard.domain.Board;

public interface BoardRepository extends JpaRepository<Board, Long>{

}

Repository 는 interface 이고, JpaRepository 라는 인터페이스를 상속 받아 JPA 내 구현체를 사용할 수 있다.

JpaRepository 를 상속 받을 때 Generic 으로 Entity 와, PK 컬럼의 데이터 타입을 넣어주면 된다.

(MyBatis 와 정말 많이 다르다!!)


5. Create, Read, Delete Test

package com.mkdevlab.springbootboard.board;

import static org.assertj.core.api.Assertions.assertThat;

import java.util.List;

import org.junit.jupiter.api.Test;
import org.springframework.beans.factory.annotation.Autowired;
import org.springframework.boot.test.context.SpringBootTest;

import com.mkdevlab.springbootboard.domain.Board;
import com.mkdevlab.springbootboard.repository.BoardRepository;

@SpringBootTest
public class BoardTests {

	@Autowired
	BoardRepository boardRepository;
	
	@Test
	void save() {
		
		// 게시글 파라미터 생성
		Board param = Board.builder()
				.title("3번 게시글 제목")
				.content("3번 게시글입니다.")
				.writer("mkdevlab")
				.hits(0)
				.deleteYn('N')
				.build();
		
		// 게시글 저장
		boardRepository.save(param);
		
		Board entity = boardRepository.findById((long) 3).get();
		assertThat(entity.getTitle()).isEqualTo("1번 게시글 제목");
		assertThat(entity.getContent()).isEqualTo("1번 게시글입니다.");
		assertThat(entity.getWriter()).isEqualTo("mkdevlab");
		
	}
	
	@Test
	void findAll() {
		
		long boardsCnt = boardRepository.count();
		
		List<Board> boards = boardRepository.findAll();
		
	}
	
	@Test
	void delete() {
		
		//게시글 조회
		Board entity = boardRepository.findById((long)3).get();
		
		//게시글 삭제
		boardRepository.delete(entity);
		
	}
	
}


jUnit Test 는 호출 할 메소드를 더블클릭하고, 마우스 오른쪽 클릭 -> Run As -> jUnit Test 클릭으로 실행 가능하다.


save()


소스코드를 붙여넣기 전 2번 정보 테스를 했다. PK 값이 2로 상승을 했기 때문에 findById 할 때 3을 기입하였다.


앞서 생성한 BoardRepository 의 save() 메소드를 사용하여 데이터를 저장할 수 있다.

Lombok 의 Builder 로 값들을 셋팅해주고 save() 메소드를 호출 해본다.

jUnit 테스트 결과에 assertThat 으로 인해 Failure 가 발생하는 것으로 보기 위해 일부러 다른 값을 넣어보았다.


그 결과...

Table 에 값이 잘 들어갔다!!


Failure 로 떨어진게 보이고, 아래 뭐가 다른지 표시되었다.


findAll()

Count 를 조회한 것과 board 테이블을 조건 없이 전체 조회 한 것으로 볼 수 있다.


delete()

잘 삭제 됐다.


끝.


Reference:

https://congsong.tistory.com/51?category=749196 


'개발이야기 > Spring Boot' 카테고리의 다른 글

Spring Boot JPA 게시판 - 글 등록/수정 (with MySQL)  (0) 2022.04.13
Spring Security  (0) 2022.04.10
ORM  (0) 2022.04.03

Spring Security 를 실습하고 기록해보자.


Spring Security 란?

Spring 에서 제공해주는 보안 솔루션이다. 개발자가 직접 보완 관련 코드를 짤 필요없기 때문에 매우 간편하다. Spring Security 에서는 인증(Authentication) 과 권한(Authorization) 기능을 모두 제공하고 있어, 이 개념을 알아야 한다.


인증과 권한

인증(Authentication) 과 권한(Authorization) 을 살펴보면, 인증은 '나'='나' 라는 것을 확인하는 절차이고, 권한은 '나' 는 어느범위까지 사용이 가능한 지를 결정하는 것이다.


Spring Security 를 사용하는 이유

>>출처<<


예제

예제 설명

Spring Security 를 이용하여 간단한 회원가입 / 로그인 기능 구현해보도록 하자. 이 과정에서 Spring Data JPA 도 사용되는데 이 주제는 다음에 다뤄보도록 하자.


총 4개의 화면으로 구성된다. + H2 Console 화면 (실제 사용자 정보가 저장되는 지 확인해보자)

  • 로그인 화면
  • 회원가입 화면
  • 사용자 화면
  • Admin 화면


총 6개의 package 로 소스코드를 관리한다.

  • config
  • domain
  • repository
  • dto
  • service
  • controller

시작

1. Spring project 를 하나 생성하자.

https://start.spring.io

  • Gradle
  • Spring Boot 2.6.6
  • Java 8
  • Jar

2. 의존성 추가

dependencies {
  implementation 'org.springframework.boot:spring-boot-starter-data-jpa'
  implementation 'org.springframework.boot:spring-boot-starter-security'
  implementation 'org.springframework.boot:spring-boot-starter-thymeleaf'
  implementation 'org.springframework.boot:spring-boot-starter-web'
  implementation 'org.thymeleaf.extras:thymeleaf-extras-springsecurity5'
  compileOnly 'org.projectlombok:lombok'
  runtimeOnly 'com.h2database:h2'
  annotationProcessor 'org.projectlombok:lombok'
}

3. domain - Entity 정보 생성

@NoArgsConstructor(access = AccessLevel.PROTECTED)
@Entity
@Getter
public class UserInfo implements UserDetails {
	
	@Id
	@Column(name = "code")
	@GeneratedValue(strategy = GenerationType.IDENTITY)
	private Long code;
	
	@Column(name = "email", unique = true)
	private String email;
	
	@Column(name = "password")
	private String password;
	
	@Column(name = "auth")
	private String auth;

	@Builder
	public UserInfo(String email, String password, String auth) {
		this.email = email;
		this.password = password;
		this.auth = auth;
	}

	@Override
	public Collection<? extends GrantedAuthority> getAuthorities() {
		
		Set<GrantedAuthority> roles = new HashSet<>();
		for(String role : auth.split("," )) {
			roles.add(new SimpleGrantedAuthority(role));
		}

		return roles;
	}

	@Override
	public String getPassword() {
		// TODO Auto-generated method stub
		return password;
	}

	@Override
	public String getUsername() {
		return email;
	}

	@Override
	public boolean isAccountNonExpired() {
		return true;
	}

	@Override
	public boolean isAccountNonLocked() {
		return true;
	}

	@Override
	public boolean isCredentialsNonExpired() {
		return true;
	}

	@Override
	public boolean isEnabled() {
		return true;
	}
	
}

회원가입 시 [이메일, 패스워드, 권한] 이 저장될 것이다. 여러개의 권한을 가질 수 있고, 콤마[,]로 구분되어 저장된다. 로그인이 될 때 권한 리스트를 불러와 Spring Security 가 인식할 것이다.


한가지 주목해야 할 점은 UserDetails 라는 인터페이스를 상속받는 것이다. 이것은 Spring 제공 하는 것으로 인증과 권한을 담당한다.


4. repository 생성

public interface UserRepository extends JpaRepository<UserInfo, Long> {
	
	Optional<UserInfo> findByEmail(String email);

}

Repository 는 interface 로 생성하고 JpaRepository 를 상속 받는다.


5. dto 생성

@Getter
@Setter
public class UserInfoDto {
	
	private String email;
	private String password;
	
	private String auth;

}


6. service 생성

@RequiredArgsConstructor
@Service
public class UserService implements UserDetailsService {
	
	private final UserRepository userRepository;
	
	public Long save(UserInfoDto userInfoDto) {
				
		BCryptPasswordEncoder encoder = new BCryptPasswordEncoder();
		userInfoDto.setPassword(encoder.encode(userInfoDto.getPassword()));
		
		return userRepository.save(UserInfo.builder()
				.email(userInfoDto.getEmail())
				.password(userInfoDto.getPassword())
				.auth(userInfoDto.getAuth()).build()
				).getCode();
	}

	@Override
	public UserInfo loadUserByUsername(String email) throws UsernameNotFoundException {

		return userRepository.findByEmail(email)
				.orElseThrow(() -> new UsernameNotFoundException(email));
	}
	
}

UserDetailsService 를 상속받고 loadUserByUsername 오버라이드 함수를 사용한다.


7. config 생성

@RequiredArgsConstructor
@EnableWebSecurity
@Configuration
public class WebSecurityConfig extends WebSecurityConfigurerAdapter{
	
	private final UserService userService;
	

	@Override
	public void configure(WebSecurity web) throws Exception {
		web.ignoring().antMatchers("/css/**", "/js/**", "/img/**");
	}

	@Override
	protected void configure(HttpSecurity http) throws Exception {
		
		http
			.authorizeRequests()
				.antMatchers("/login", "/signup", "/user").permitAll()
				.antMatchers("/h2-console/**").permitAll()
				.antMatchers("/").hasRole("USER")
				.antMatchers("/admin").hasRole("ADMIN")
				.anyRequest().authenticated()	
			.and()			
            	.csrf()
                	.ignoringAntMatchers("/h2-console/**")
            .and()
            	.headers()
            		.frameOptions().sameOrigin()
			.and()
				.formLogin()
					.loginPage("/login")
					.defaultSuccessUrl("/")
			.and()
				.logout()
					.logoutSuccessUrl("/")
					.invalidateHttpSession(true);
		
		
	}
	
	@Override
	protected void configure(AuthenticationManagerBuilder auth) throws Exception {
		auth.userDetailsService(userService).passwordEncoder(new BCryptPasswordEncoder());
	}
	

}

WebSecurityConfigurerAdapter 를 상속 받는다. 세 개의 configure 메서드는 역할이 각각 다르다.

configure(WebSecurity web)
// -> static 하위 resource 디렉토리를 접근 불가한 리스트에서 제외할 수 있다.

configure(HttpSecurity http)
// -> http 관련 인증 설정을 담당한다.

    antMatchers // 경로 권한 설정을 담당한다.
        permitAll // 누구나 접근 가능
        hasRole // 기재된 권한이 있는 경우 접근 가능
        anyRequest // antMatchers 외 경로
        authenticated // 권한 있으면 접근 가능

    formLogin() // 로그인 설정
        loginPage("/login") // 로그인 화면
        defaultSuccessUrl("/") // 로그인 성공 시 이동할 화면

    logout() // 로그아웃 설정
        logoutSuccessUrl("/") // 로그아웃 시 이동할 화면
        invalidateHttpSession(true); // 로그아웃 시 세션 제거 여부

configure(AuthenticationManagerBuilder auth)
// -> 로그인 인증을 담당하고, 사용자 정보를 불러온다.

8. controller 생성

@RequiredArgsConstructor
@Controller
public class UserController {
	
	private final UserService userService;
	
	@PostMapping("/user")
	public String signup(UserInfoDto userInfoDto) {
		userService.save(userInfoDto);
		return "/login";
	}
	
	@GetMapping("/logout")
	public String logoutPage(HttpServletRequest request, HttpServletResponse response) {
		new SecurityContextLogoutHandler().logout(request, response, SecurityContextHolder.getContext().getAuthentication());
		return "/login";
	}

}

GET 메소드로도 로그아웃이 가능하다. SecurityContextLogoutHandler 을 사용하면 된다.


이제 View 화면을 구성해보자.

  • login.html
  • signup.html
  • main.html
  • admin.html

Controller에 등록을 해도 되지만, WebMvcConfigurer 을 사용하여 이동할 화면을 매핑을 해보자.


9. MVC config 생성

@Configuration
public class MvcConfig implements WebMvcConfigurer{

	@Override
	public void addViewControllers(ViewControllerRegistry registry) {

		registry.addViewController("/").setViewName("main");
		registry.addViewController("/login").setViewName("login");
	    registry.addViewController("/admin").setViewName("admin");
	    registry.addViewController("/signup").setViewName("signup");
		
	}
}


10. View 생성


login.html

<!DOCTYPE html>
<html>
<head>
<meta charset="UTF-8">
<title>Login</title>
</head>
<body>
	<h1>Login</h1> <hr>
    <img src="/img/info.jpeg" />

    <form action="/login" method="POST">
      <input type="hidden" th:name="${_csrf.parameterName}" th:value="${_csrf.token}" />
      email : <input type="text" name="username"> <br>
      password : <input type="password" name="password"> <br>
      <button type="submit">Login</button>
    </form> <br>

    <a href="/signup">Go to join! →</a>

</body>
</html>


signup.html

<!DOCTYPE html>
<html>
<head>
<meta charset="UTF-8">
<title>sign up</title>
</head>
<body>
	<h1>Sign Up</h1> <hr>

    <form th:action="@{/user}" method="POST">
      email : <input type="text" name="email"> <br>
      password : <input type="password" name="password"> <br>
      <input type="radio" name="auth" value="ROLE_ADMIN,ROLE_USER"> admin
      <input type="radio" name="auth" value="ROLE_USER" checked="checked"> user <br>
      <button type="submit">Join</button>
    </form> <br>

    <a href="/login">Go to login →</a>

</body>
</html>


main.html

<!DOCTYPE html>
<html>
<head>
<meta charset="UTF-8">
<title>Main</title>
</head>
<body>
	<h2>회원 전용 페이지</h2>
	ID : <span sec:authentication="name"></span><br>
	소유 권한 : <span sec:authentication="authorities"></span><br>
	
	<form id="logout" action="/logout" method="POST">
		<input type="hidden" th:name="${_csrf.parameterName}" th:value="${_csrf.token}" />
      	<input type="submit" value="로그아웃"/>
	</form>
	

</body>
</html>


admin.html

<!DOCTYPE html>
<html>
<head>
<meta charset="UTF-8">
<title>Insert title here</title>
</head>
<body>
	<h2>관리자 전용 페이지</h2>
    ID : <span sec:authentication="name"></span> <br>
    소유 권한 : <span sec:authentication="authorities"></span> <br>

    <form id="logout" action="/logout" method="POST">
      <input type="hidden" th:name="${_csrf.parameterName}" th:value="${_csrf.token}" />
      <input type="submit" value="로그아웃"/>
     </form>
</body>
</html>


11. Spring boot 실행


localhost:8080/ 접속하면 main.html 로 이동이 될 것이다. 근데 로그인 정보가 없으니 /login 화면으로 이동 됨.

사용자 정보가 없기 때문에 signup 을 해보자.

localhost:8080/signup

admin 을 선택하는 경우 DB 에 ROLE_USER, ROLE_ADMIN 두개가 들어간다.

H2 console 에서 조회해보면 아래와 같이 조회된다.


이제 로그인을 해보자.

ADMIN, USER 두 권한이 모두 존재하기 때문에, 회원용, admin용 화면 두 곳 모두 접속이 가능한 것을 볼 수있다.

로그아웃하면 다시 로그인 화면으로 이동한다.


다음으로는 사용자로 가입을 하고 화면 접근을 확인해보자.

localhost:8080/admin 으로 접속 시도 시 위와 같이 403 오류가 발생하는 것을 볼 수 있다.

이것으로 실습을 마치자..


Reference : https://shinsunyoung.tistory.com/78

'개발이야기 > Spring Boot' 카테고리의 다른 글

Spring Boot JPA 게시판 - 글 등록/수정 (with MySQL)  (0) 2022.04.13
Spring Boot JPA 게시판 - CRUD (with MySQL)  (0) 2022.04.11
ORM  (0) 2022.04.03


Spring 은 고전적으로 iBatis 를 사용하였고, iBatis 는 MyBatis로 발전했다.

~2018년 이전에 개발된 Spring 어플리케이션들을 보면 Mapper 방식으로 MyBatis 를 대부분 채택 했을 것이다.


요즘 핫하게 많이 들려오는 ORM 이라는 단어가 있다.

ORM : Object Relational Mapping (객체-관계 매핑)


사실 조금 생소하긴 하다. 현업에서 사용하지 않다보니 경험해볼 일이 없기도 하고...

인터넷을 검색해보면 찾을 수 있는 개념은,, (출처 : https://gmlwjd9405.github.io/2019/02/01/orm.html)


ORM 이란 ?

  • 객체와 관계형 데이터베이스의 데이터를 자동으로 매핑(연결)해주는 것을 말한다.
    - 객체 지향 프로그래밍은 클래스를 사용하고, 관계형 데이터베이스는 테이블을 사용한다.
    - 객체 모델과 관계형 모델 간에 불일치가 존재한다.
  • ORM을 통해 객체 간의 관계를 바탕으로 SQL을 자동으로 생성하여 불일치를 해결한다.
    - 데이터베이스 데이터 <—매핑—> Object 필드
  • 객체를 통해 간접적으로 데이터베이스 데이터를 다룬다.
    - Persistant API라고도 할 수 있다.
    - Ex) JPA, Hibernate 등

ORM 장단점


Hibernate 를 사용하게 되면 persist(), merget(), close() 등을 직접 사용하고, 

transation 이 발생할 때 getTransation.begin(), commit() 등으로 관리를 한다.


Spring Data JPA 는 개발자가 조금 더 사용하기 편리하게 만들어 놓은 것이다.

Hibernate 를 한번 감싸고 있고, 위와 같은 명령어를 굳이 신경쓰지 않고 개발을 할 수 있도록 해준다.

+ Recent posts